Integrating FormEngine with Angular
Learn how to integrate FormEngine with Angular applications to build dynamic forms using both reactive and template-driven approaches with live preview and validation.
In this guide, you'll learn:
- How to set up FormEngine in an Angular project
- How to integrate FormEngine with Angular reactive forms
- How to synchronize form data between Angular and FormEngine
- How to use FormEngine with Angular template-driven forms
- How to integrate FormEngine Designer with Angular for visual form building
- How to preview forms in real-time while designing
Preface
Angular is a powerful framework for building dynamic web applications, and FormEngine provides a comprehensive solution for creating and managing forms. This guide shows you how to integrate FormEngine with Angular to build dynamic forms using both reactive and template-driven approaches, with live preview and validation capabilities.
Full source code along with other examples available at our public GitHub repository.
Prerequisites
- Basic knowledge of Angular and TypeScript
- An existing Angular project or create a new one with
ng new - Node.js and npm installed
- Familiarity with reactive or template-driven forms in Angular
The example with reactive forms
Assume we already have a simple booking form built using Angular's reactive forms, and we want to leverage the power of FormEngine. To get started, you can choose a pre-made application that serves as starting point.
git clone https://github.com/optimajet/formengine
cd formengine/premium/examples/with-angular-forms/step1-reactive-forms
npm install
npm run start
Now you'll see our form alongside with debug output.
The implementation is very straightforward. The main idea is to create fields with default validation rules and a simple template.
Click to view the code.
export class BookingFormComponent implements OnInit {
  constructor() {
    this.bookingForm = new FormGroup({
      guests: new FormArray([
        this.createGuestFormGroup()
      ]),
      checkin: new FormControl('', Validators.required)
    });
  }

  createGuestFormGroup(): FormGroup {
    return new FormGroup({
      name: new FormControl('', [Validators.required, validateFullName]),
      email: new FormControl('', [Validators.required, Validators.email])
    });
  }

  get guests(): FormArray<FormGroup> {
    return this.bookingForm?.get('guests') as FormArray<FormGroup>
  }

  addGuest(): void {
    this.guests.push(this.createGuestFormGroup());
  }

  removeGuest(index: number): void {
    this.guests.removeAt(index);
  }
}
<form [formGroup]="bookingForm" (ngSubmit)="onSubmit()" class="booking-form">
  <div formArrayName="guests" class="booking-form-item">
    <div *ngFor="let guest of guests.controls; let i = index">
      <fieldset [formGroupName]="i">
        <label>Guest {{ i + 1 }}:</label>
        <input placeholder="Full name" title="Full name" formControlName="name" type="text">
        <input placeholder="e-mail" title="e-mail" formControlName="email" type="email">
        <button type="button" (click)="removeGuest(i)">Remove</button>
      </fieldset>
    </div>
  </div>
  <button type="button" (click)="addGuest()" class="add">Add Guest</button>
  <label>Check-in:</label>
  <input formControlName="checkin" type="date">
  <button type="submit">Book</button>
</form>
FormEngine
This section explains how to integrate FormEngine's FormViewer component into your Angular application. You'll learn how to set up the
viewer, synchronize form data between Angular and FormEngine, and define forms using JSON with custom validators.
What you'll accomplish
By the end of this section, you'll have:
- Installed the required FormEngine packages
- Created an Angular component that hosts the FormEngine
FormViewer - Configured the viewer with rsuite components and CSS loaders
- Synchronized form data between Angular and FormEngine
- Defined a form using JSON and custom validators
Installation
First, add the necessary FormEngine packages to your Angular project:
npm install @react-form-builder/components-rsuite @react-form-builder/core @bubblydoo/angular-react
We use @bubblydoo/angular-react as the bridge between Angular templates and React components. This approach keeps the integration explicit
and lets you mount FormEngine components with the react-wrapper directive.
For Designer integration (covered in the Designer section), you'll also need to install @react-form-builder/designer.
The complete example is available in the examples folder.
Viewer setup in Angular
The step2-formengine example creates a single Angular component that hosts the FormEngine FormViewer. This component manages the booking
form data and handles synchronization between Angular and FormEngine.
import {Component, ElementRef, NgZone, ViewChild} from '@angular/core';
import {CommonModule, JsonPipe} from '@angular/common';
import {AngularReactModule} from '@bubblydoo/angular-react';
import {createElement, ForwardedRef} from 'react';
import {
  ltrCssLoader,
  RsLocalizationWrapper,
  rSuiteComponents,
  rtlCssLoader,
} from '@react-form-builder/components-rsuite';
import {
  BiDi,
  createView,
  FormViewer,
  FormViewerProps,
  IFormData,
  IFormViewer,
} from '@react-form-builder/core';

import form from './form.json';
import {customValidators} from './validators';

export const loadForm = () => JSON.stringify(form);
const Viewer = (props: FormViewerProps) => createElement(FormViewer, props);

const viewerComponents = rSuiteComponents.map((c) => c.build().model);

const viewerView = createView(viewerComponents)
  .withViewerWrapper(RsLocalizationWrapper)
  .withCssLoader(BiDi.LTR, ltrCssLoader)
  .withCssLoader(BiDi.RTL, rtlCssLoader)

interface PersonInfo {
  email: string;
  name: string;
}

interface BookingFormData {
  persons: Array<PersonInfo>;
  checkin?: Date | null | string;
}

@Component({
  selector: 'app-booking-form',
  standalone: true,
  imports: [JsonPipe, CommonModule, AngularReactModule],
  templateUrl: './booking-form.component.html',
  styleUrl: './booking-form.component.css',
})
export class BookingFormComponent {
  protected readonly Viewer = Viewer;
  @ViewChild('resultDialog') resultDialog?: ElementRef<HTMLDialogElement>;
  bookingForm: BookingFormData = {
    persons: [this.createPerson()],
    checkin: null,
  };
  dialogMessage: string = '';
  dialogOpen: boolean = false;
  viewerRef: IFormViewer | null = null;
  viewerProps: FormViewerProps;
  formEngineErrors: Record<string, unknown> = {};

  constructor(private readonly ngZone: NgZone) {
    const viewerRef: ForwardedRef<IFormViewer> = (ref) => (this.viewerRef = ref);

    this.viewerProps = {
      view: viewerView,
      getForm: loadForm,
      validators: customValidators,
      initialData: this.toViewerData(this.bookingForm),
      onFormDataChange: this.syncFormData.bind(this),
      viewerRef,
    };
  }

  createPerson(): PersonInfo {
    return {
      name: '',
      email: '',
    };
  }
}
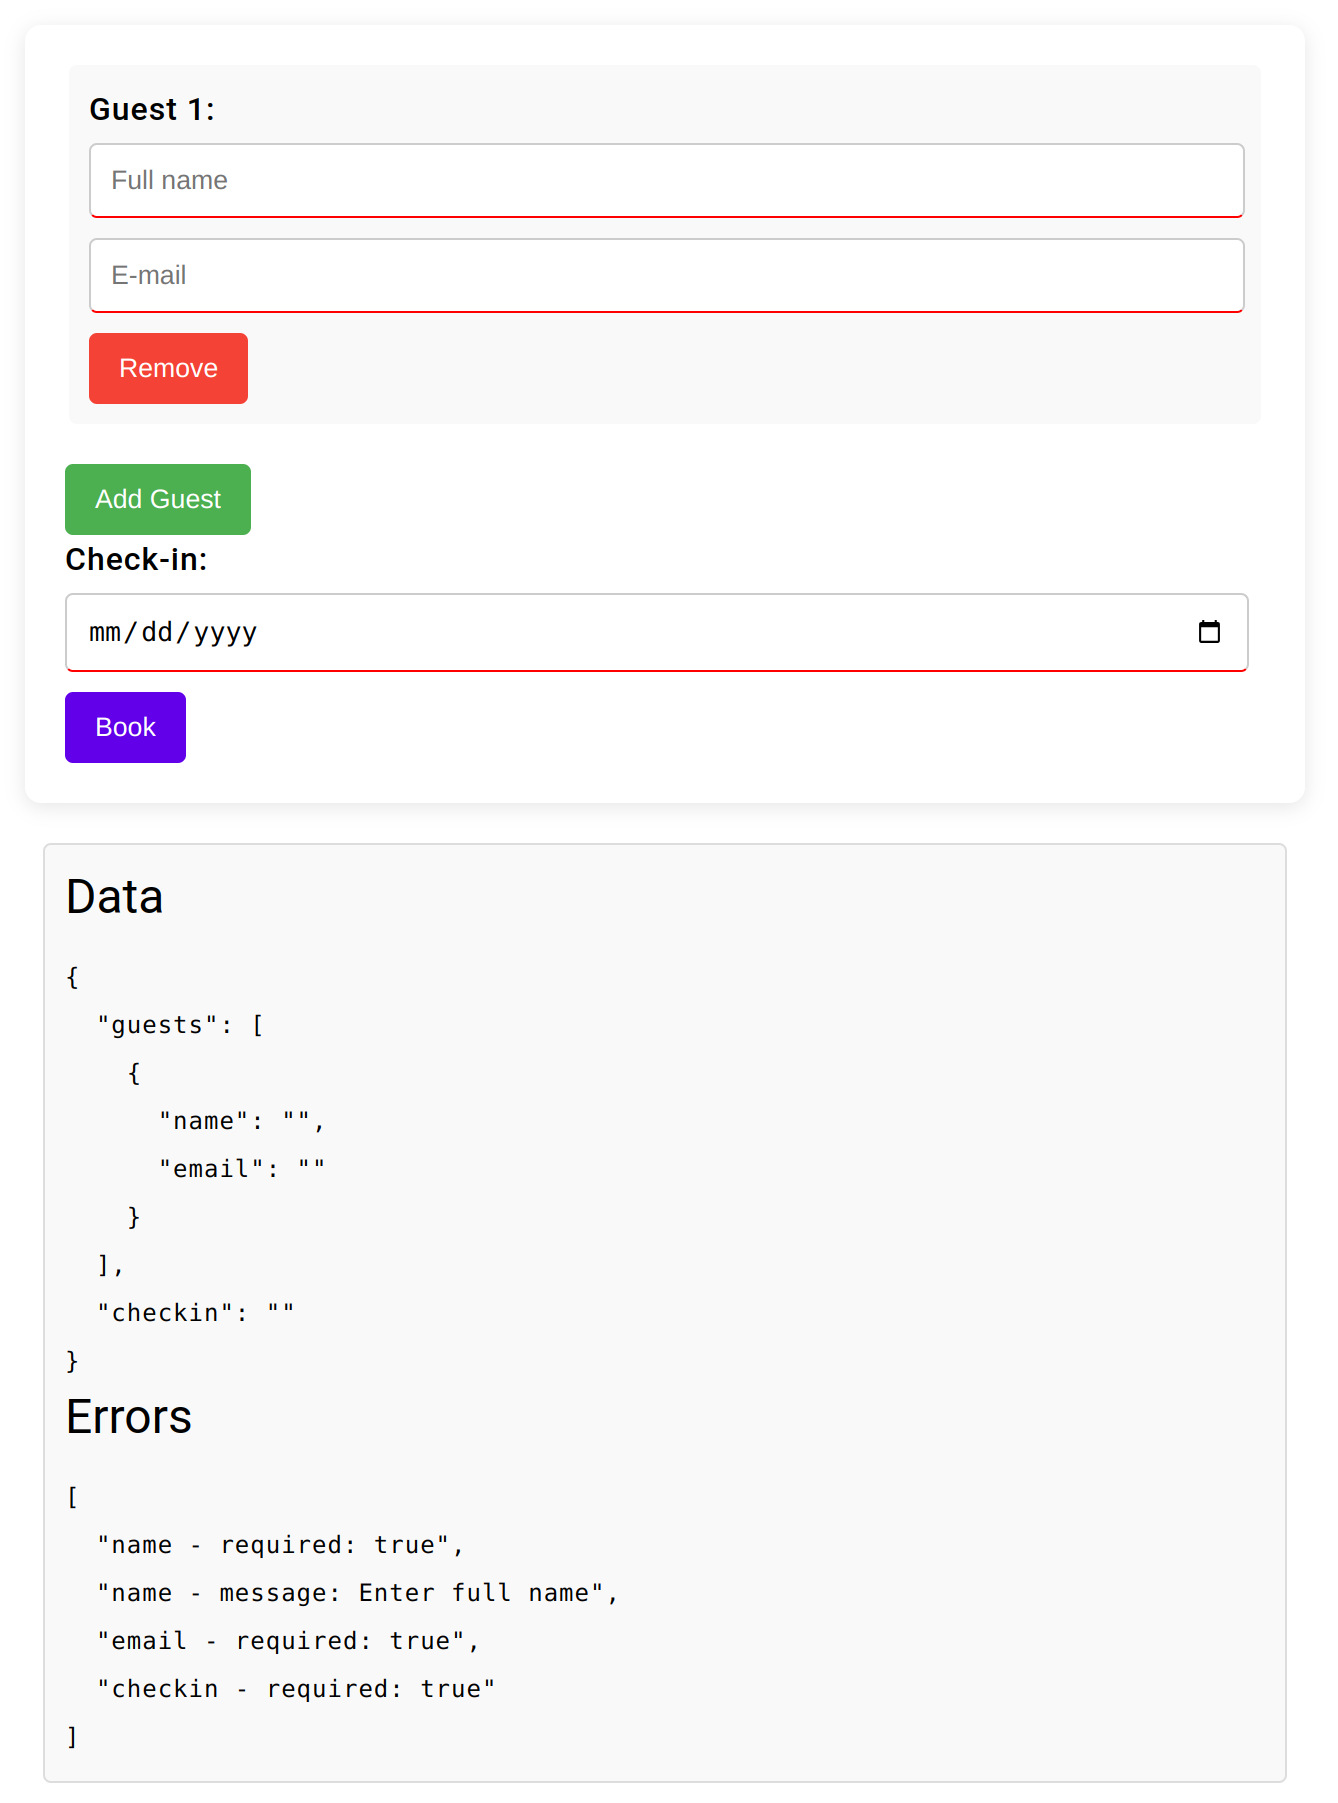
The template renders a single FormViewer instance and a debug block that shows the current data and validation errors from FormEngine:
<div class="ng-app">
  <h3>Angular APP</h3>
  <form class="booking-form">
    <div class="booking-form-item">
      <h3>FromViewer</h3>
      <react-wrapper [component]="Viewer" [props]="viewerProps"/>
    </div>
    <button type="button" (click)="onSubmit()">Book</button>
  </form>
  <div class="debug-output">
    <h6>Data</h6>
    <pre>{{ bookingForm | json }}</pre>
    <h6>Errors</h6>
    <pre>{{ errors | json }}</pre>
  </div>
  <dialog #resultDialog>
    <p>{{ dialogMessage }}</p>
    <form method="dialog">
      <button (click)="closeDialog()">OK</button>
    </form>
  </dialog>
</div>
Synchronizing form data
The key integration point between Angular and FormEngine is the syncFormData method. This callback receives the IFormData payload from
FormEngine whenever the form data changes, normalizes it, and updates the Angular component state.
FormEngine calls onFormDataChange whenever form values change, giving you a consistent way to keep your Angular state in sync with the
form UI.
export class BookingFormComponent {
  // ...

  syncFormData(formData: IFormData): void {
    const {data, errors} = formData;

    this.ngZone.run(() => {
      const persons = this.normalizePersons(data['persons'] ?? this.bookingForm.persons);
      this.bookingForm = {
        persons: persons.length > 0 ? persons : [this.createPerson()],
        checkin: this.normalizeCheckin(data['checkin'] ?? this.bookingForm.checkin),
      };

      this.formEngineErrors = errors as Record<string, unknown>;
    });
  }

  get errors(): Array<string> {
    return this.collectFormEngineErrors(this.formEngineErrors);
  }

  onSubmit(): void {
    const runResultDialog = () => {
      this.ngZone.run(() => {
        const formErrors = this.errors;
        if (formErrors.length > 0) {
          console.log(formErrors);
          this.dialogMessage = 'Form data incomplete';
        } else {
          console.log(this.bookingForm);
          this.dialogMessage = 'Thank you! Your request will be processed!';
        }
        this.openDialog();
      });
    };

    const validatePromise = this.viewerRef?.formData.validate();
    if (!validatePromise) {
      runResultDialog();
      return;
    }

    validatePromise
      .catch(() => {
        // Validation failures are reflected in form errors and handled in runResultDialog.
      })
      .finally(() => {
        runResultDialog();
      });
  }
}
Form definition and validators
FormEngine forms are defined using JSON schemas that describe the form structure, fields, validation rules, and styling. The JSON form
definition is stored alongside the component and loaded via the loadForm helper.
Form definitions are portable JSON structures that can be:
- Created visually using FormEngine Designer
- Stored in databases or version control
- Shared between different parts of your application
- Dynamically loaded at runtime
Click to view form definition.
{
  "errorType": "RsErrorMessage",
  "version": "1",
  "form": {
    "key": "Screen",
    "type": "Screen",
    "props": {},
    "children": [
      {
        "key": "personsToolbar",
        "type": "RsContainer",
        "props": {},
        "children": [
          {
            "key": "addPersonButton",
            "type": "RsButton",
            "props": {
              "children": {
                "value": "Add person"
              },
              "appearance": {
                "value": "primary"
              },
              "color": {
                "value": "green"
              }
            },
            "events": {
              "onClick": [
                {
                  "name": "addRow",
                  "type": "common",
                  "args": {
                    "dataKey": "persons"
                  }
                }
              ]
            },
            "wrapperCss": {
              "any": {
                "object": {
                  "width": "min-content"
                }
              }
            }
          }
        ]
      },
      {
        "key": "persons",
        "type": "Repeater",
        "props": {
          "value": {
            "value": [
              {}
            ]
          }
        },
        "children": [
          {
            "key": "personContainer",
            "type": "RsContainer",
            "props": {},
            "css": {
              "any": {
                "string": "  border: none;\n  padding: 10px;\n  margin-bottom: 10px;\n  background-color: #f9f9f9;\n  border-radius: 4px;"
              }
            },
            "children": [
              {
                "key": "name",
                "type": "RsInput",
                "props": {
                  "label": {
                    "value": "Full name"
                  }
                },
                "schema": {
                  "validations": [
                    {
                      "key": "isFullName",
                      "type": "custom"
                    }
                  ]
                },
                "css": {
                  "any": {
                    "string": "    input {\n        border: 1px solid #ccc;\n    }\n    input:focus {\n        box-shadow: none;\n        outline: none;\n        border: 1px solid #ccc;\n\n    }\n    &+p {\n        border-bottom: 1px solid red;\n    }\n    &~p {\n        height: 0;\n        overflow: hidden;\n    }"
                  }
                }
              },
              {
                "key": "email",
                "type": "RsInput",
                "props": {
                  "label": {
                    "value": "E-mail"
                  }
                },
                "schema": {
                  "validations": [
                    {
                      "key": "emailAddressValid",
                      "type": "custom"
                    }
                  ]
                },
                "css": {
                  "any": {
                    "string": "    input {\n        border: 1px solid #ccc;\n    }\n    input:focus {\n        box-shadow: none;\n        outline: none;\n        border: 1px solid #ccc;\n\n    }\n    &+p {\n        border-bottom: 1px solid red;\n    }\n    &~p {\n        height: 0;\n        overflow: hidden;\n    }"
                  }
                }
              },
              {
                "key": "removePersonButton",
                "type": "RsButton",
                "props": {
                  "children": {
                    "value": "Remove person"
                  },
                  "appearance": {
                    "value": "primary"
                  },
                  "color": {
                    "value": "red"
                  }
                },
                "wrapperCss": {
                  "any": {
                    "object": {
                      "width": "min-content"
                    }
                  }
                },
                "events": {
                  "onClick": [
                    {
                      "name": "removeRow",
                      "type": "common",
                      "args": {
                        "min": 1
                      }
                    }
                  ]
                }
              }
            ]
          }
        ]
      },
      {
        "key": "checkin",
        "type": "RsDatePicker",
        "props": {
          "label": {
            "value": "Check-in"
          },
          "oneTap": {
            "value": true
          },
          "editable": {
            "value": false
          }
        },
        "schema": {
          "validations": [
            {
              "key": "required"
            }
          ]
        }
      }
    ]
  },
  "localization": {},
  "languages": [
    {
      "code": "en",
      "dialect": "US",
      "name": "English",
      "description": "American English",
      "bidi": "ltr"
    }
  ],
  "defaultLanguage": "en-US"
}
Validators are provided by FormEngine and wired into the viewer through the validators prop:
import {RuleValidatorResult, Validators} from "@react-form-builder/core";

export const customValidators: Validators = {
  'string': {
    'isFullName': {
      validate: (value: string, _event, _args): RuleValidatorResult => {
        const valid = !!value && value.trim().split(' ').length > 1;

        return valid ? true : 'Please enter a full name'
      }
    },
    'emailAddressValid': {
      validate: (value: string, _event, _args) => {
        const pattern = /[a-z0-9._%+-]+@[a-z0-9.-]+\.[a-z]{2,4}$/

        return pattern.test(value) ? true : 'Please enter a valid email address'
      }
    }
  }
}
Working with template-driven forms
Angular supports two approaches to forms: reactive forms (which we covered above) and template-driven forms. While reactive forms are generally recommended for complex scenarios, template-driven forms are still widely used in existing applications and can be a good fit for simpler use cases.
FormEngine works equally well with both approaches. The main difference is how you bind data between Angular and FormEngine.
Key differences from reactive forms
With template-driven forms:
- Data binding: Form data is bound using template directives like
[(ngModel)]instead of reactive form controls - Validation: Validation is defined in the template using directives rather than in the component class
- Error handling: Validation errors are exposed differently and need to be merged with FormEngine errors
Example implementation
The step3-template-forms example demonstrates how to integrate FormEngine with Angular template-driven forms. The component uses the same
FormViewer configuration and validators as in the reactive example, but binds the data through template-driven bindings:
- FormEngine setup: Identical to reactive forms – same viewer configuration, validators, and JSON form definition
- Data synchronization: The
syncFormDatamethod still receivesIFormDatafrom FormEngine - Error merging: Angular validation errors are merged with FormEngine validation errors into a single collection exposed as
errors
When to use template-driven forms with FormEngine
Consider using template-driven forms with FormEngine when:
- You're migrating an existing application that already uses template-driven forms
- You have simple forms that don't require complex reactive patterns
- Your team is already familiar with template-driven forms and
ngModel
The full source code for template-driven forms integration is available in the examples folder.
Designer
Designer integration follows the same pattern: mount the React FormBuilder through react-wrapper from @bubblydoo/angular-react.
For detailed instructions and examples, you can jump to the
source code to see how it works in
practice.
While the overall functionality of Designer is largely consistent with FormViewer, there are some important differences in the
initialization mechanics:
- Components metadata: Designer needs full component metadata (
componentsMetadata) to drive the palette, inspector, and schema editor, not just viewer models. - Builder view: Instead of
createView, Designer usesnew BuilderView(componentsMetadata)to configure tool panels, wrappers, and CSS loaders. - Schema persistence: Designer expects an
IFormStorageimplementation so it can load and save form schemas; in the example this is backed bylocalStorage. - Live schema updates: The
onFormSchemaChangecallback is used to keepformSchemaand the preview viewer in sync whenever the user edits the form in Designer.
<main class="app">
  <h1>AngularApp</h1>
  <div class="section designer">
    <react-wrapper [component]="Builder" [props]="builderProps"/>
  </div>

  <div class="section preview">
    <h2>Synced Form App</h2>
    <div *ngIf="previewVisible" class="preview-viewer">
      <react-wrapper [component]="Viewer" [props]="viewerProps"/>
    </div>
    <button type="button" (click)="onSubmitPreview()">Book</button>

    <div class="debug-output">
      <h6>Data</h6>
      <pre>{{ previewData | json }}</pre>
      <h6>Errors</h6>
      <pre>{{ previewErrors | json }}</pre>
    </div>
  </div>

  <dialog #resultDialog>
    <p>{{ dialogMessage }}</p>
    <form method="dialog">
      <button (click)="closeDialog()">OK</button>
    </form>
  </dialog>
</main>
import {CommonModule} from '@angular/common';
import {Component, ElementRef, NgZone, ViewChild} from '@angular/core';
import {AngularReactModule} from '@bubblydoo/angular-react';
import {createElement, ForwardedRef} from 'react';
import {
  ltrCssLoader,
  RsLocalizationWrapper,
  rSuiteComponents,
  rtlCssLoader,
} from '@react-form-builder/components-rsuite';
import {
  BiDi,
  createView,
  FormViewer,
  FormViewerProps,
  IFormData,
  IFormViewer,
} from '@react-form-builder/core';
import {BuilderView, FormBuilder} from '@react-form-builder/designer';
import type {FormBuilderProps, IFormStorage} from '@react-form-builder/designer';
import {customValidators} from './validators';
import form from './form.json';

const componentsMetadata = rSuiteComponents.map((definer) => definer.build());
const viewerComponents = componentsMetadata.map((componentMetadata) => componentMetadata.model);

const builderView = new BuilderView(componentsMetadata)
  .withViewerWrapper(RsLocalizationWrapper)
  .withCssLoader(BiDi.LTR, ltrCssLoader)
  .withCssLoader(BiDi.RTL, rtlCssLoader)

const viewerView = createView(viewerComponents)
  .withViewerWrapper(RsLocalizationWrapper)
  .withCssLoader(BiDi.LTR, ltrCssLoader)
  .withCssLoader(BiDi.RTL, rtlCssLoader)

const customization = {
  Forms_Tab: {
    hidden: true,
  },
};

const formName = 'form';
const defaultFormSchema = JSON.stringify(form);

export const formStorage: IFormStorage = {
  getForm: async () => localStorage.getItem(formName) || defaultFormSchema,
  saveForm: async (_, schema) => localStorage.setItem(formName, schema),
  getFormNames: () => Promise.resolve([formName]),
  removeForm: () => Promise.resolve(),
};

export const loadForm = () => formStorage.getForm('');
const Builder = (props: FormBuilderProps) => createElement(FormBuilder, props);
const Viewer = (props: FormViewerProps) => createElement(FormViewer, props);

@Component({
  selector: 'app-root',
  standalone: true,
  imports: [CommonModule, AngularReactModule],
  templateUrl: './app.component.html',
  styleUrl: './app.component.css',
})
export class AppComponent {
  protected readonly Builder = Builder;
  protected readonly Viewer = Viewer;
  @ViewChild('resultDialog') resultDialog?: ElementRef<HTMLDialogElement>;
  title = 'FormEngine with Angular designer';
  formSchema = localStorage.getItem(formName) || defaultFormSchema;
  previewVisible = true;
  previewData: Record<string, unknown> = {
    persons: [{name: '', email: ''}],
    checkin: null,
  };
  previewErrors: Record<string, unknown> = {};
  viewerRef: IFormViewer | null = null;
  dialogMessage = '';
  builderProps: FormBuilderProps;
  viewerProps: FormViewerProps;

  constructor(private readonly ngZone: NgZone) {
    const viewerRef: ForwardedRef<IFormViewer> = (ref) => (this.viewerRef = ref);

    this.builderProps = {
      view: builderView,
      getForm: this.loadCurrentForm.bind(this),
      formStorage,
      validators: customValidators,
      onFormSchemaChange: this.onFormSchemaChange.bind(this),
      customization,
    };

    this.viewerProps = {
      view: viewerView,
      getForm: this.loadCurrentForm.bind(this),
      validators: customValidators,
      initialData: this.previewData,
      onFormDataChange: this.onPreviewDataChange.bind(this),
      viewerRef,
    };
  }

  onSubmitPreview(): void {
    const runResultDialog = () => {
      this.ngZone.run(() => {
        const errors = this.collectFormEngineErrors(this.previewErrors);
        if (errors.length > 0) {
          this.dialogMessage = 'Form data incomplete';
        } else {
          this.dialogMessage = 'Thank you! Your request will be processed!';
        }
        this.openDialog();
      });
    };

    const validatePromise = this.viewerRef?.formData.validate();
    if (!validatePromise) {
      runResultDialog();
      return;
    }

    validatePromise
      .catch(() => {
        // Validation failures are reflected in previewErrors and handled below.
      })
      .finally(() => {
        runResultDialog();
      });
  }

  // ...
}
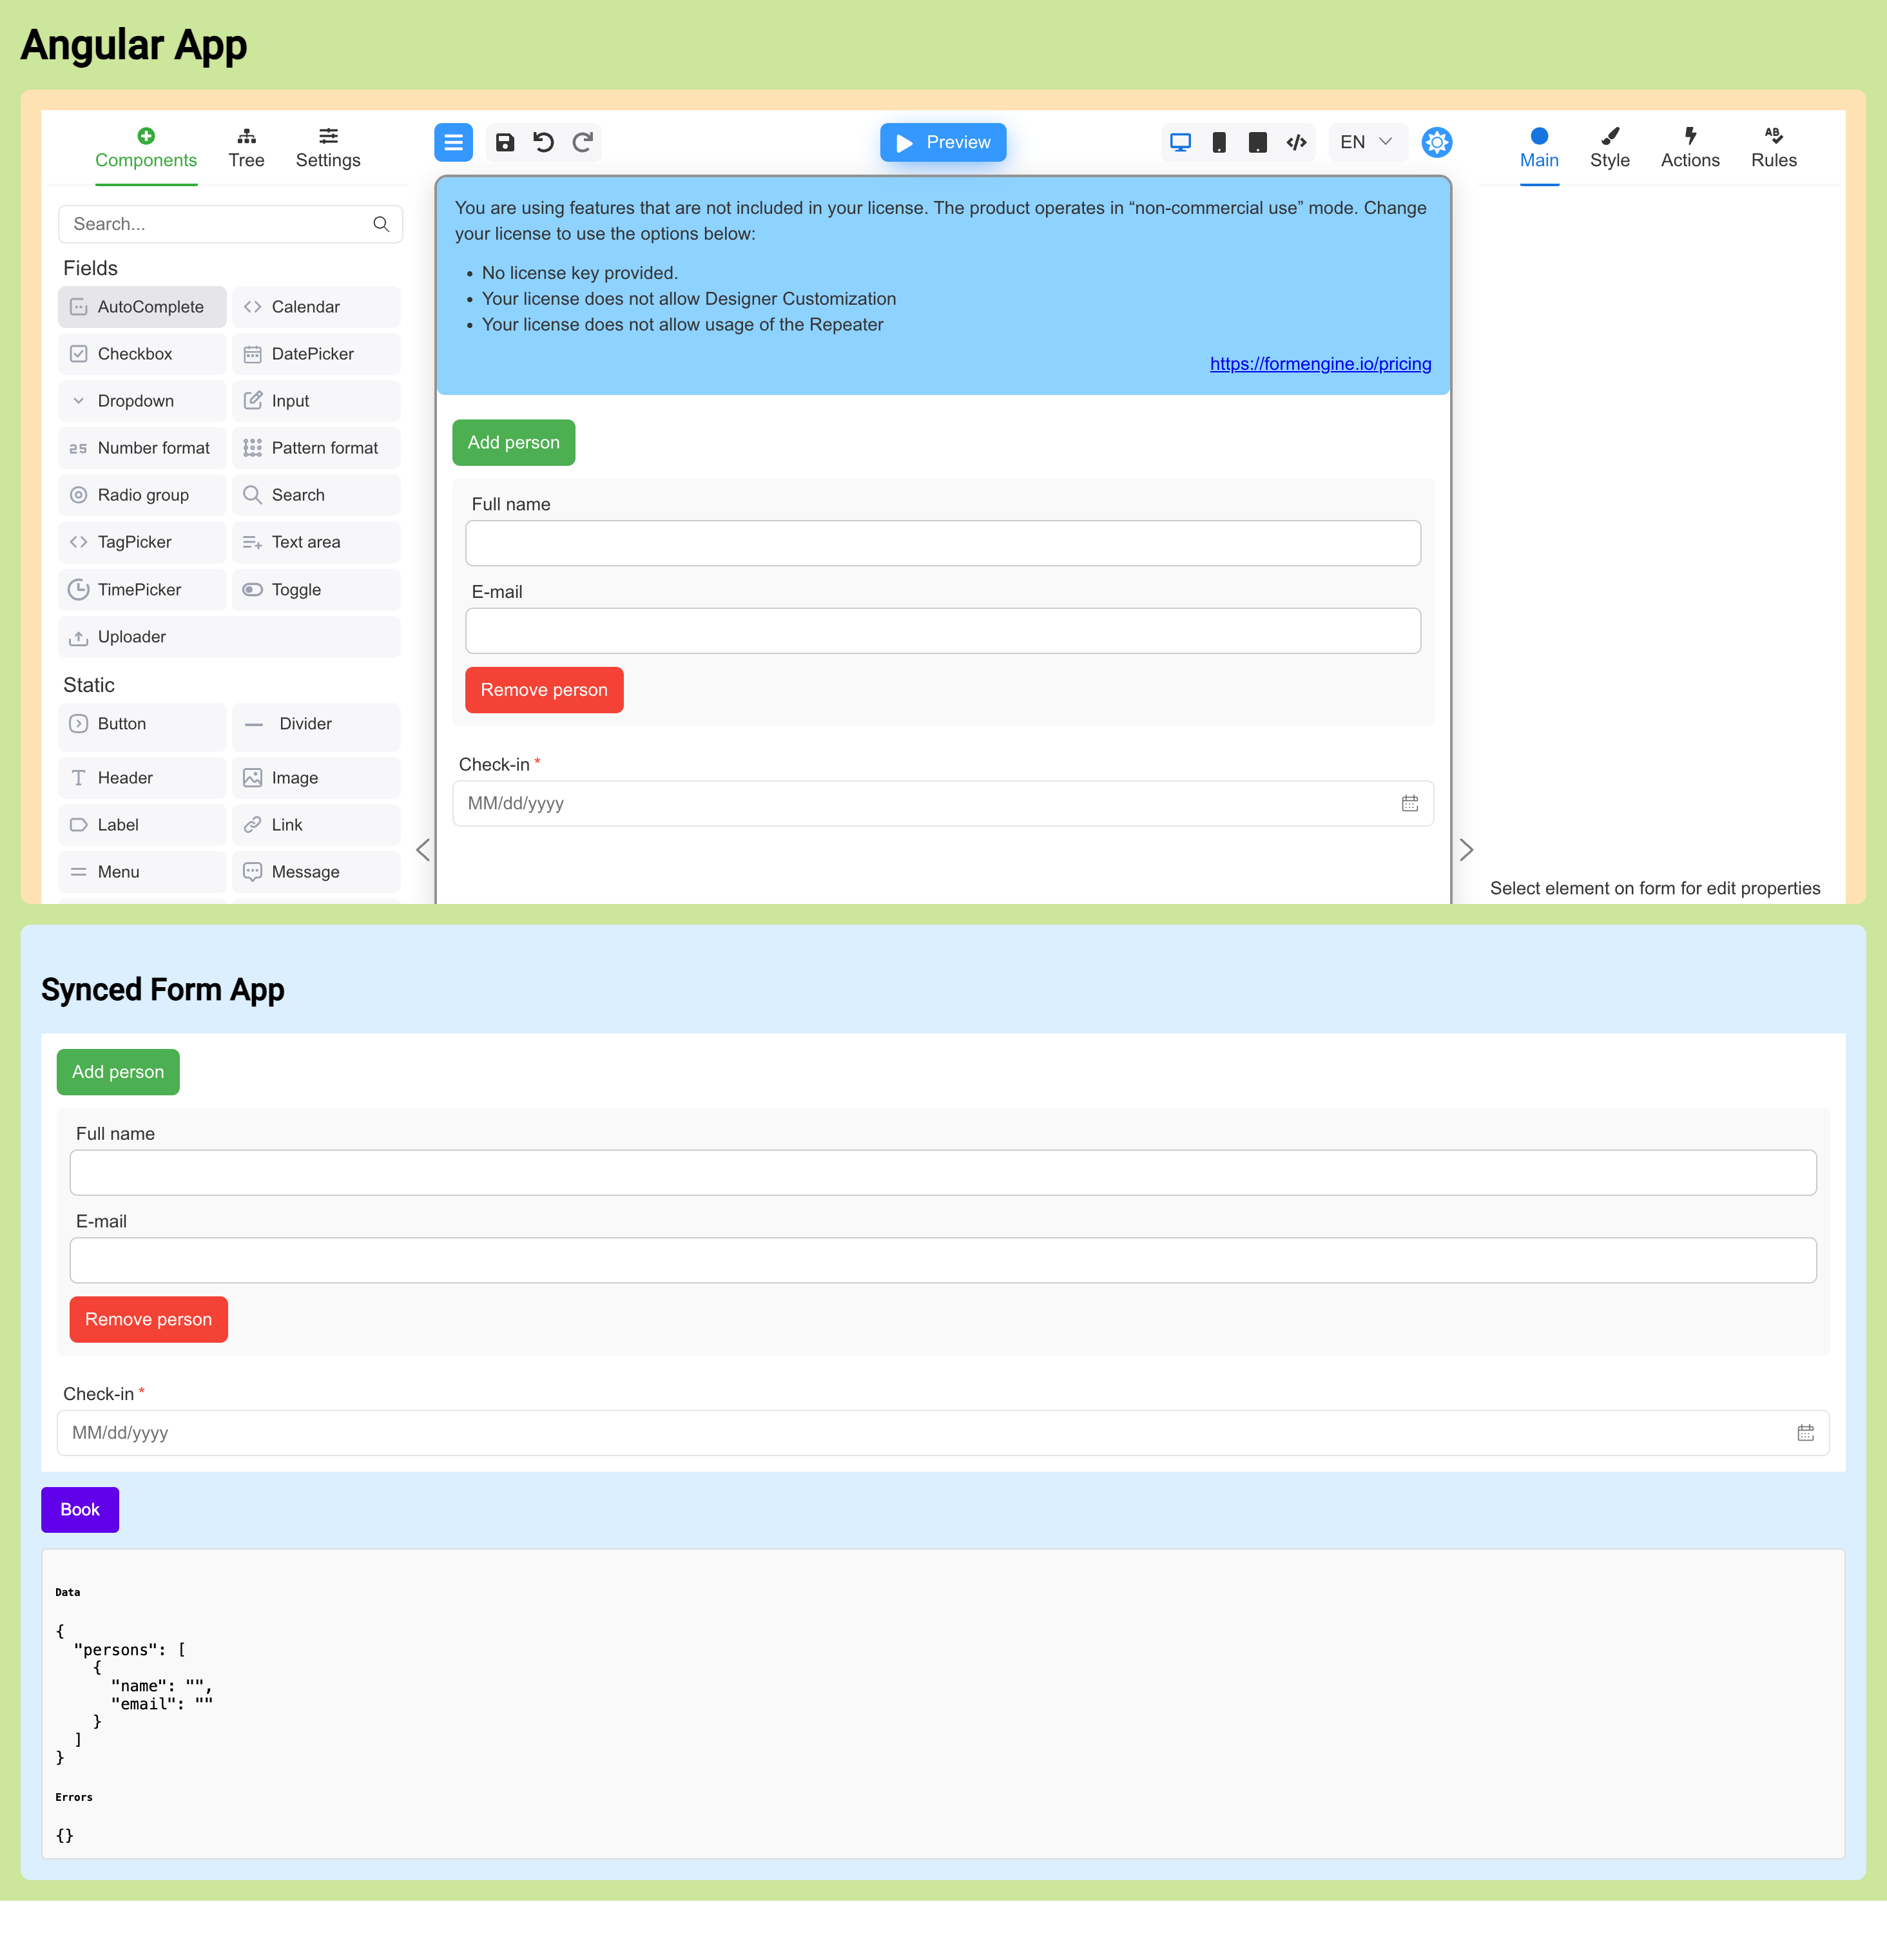
Previewing the form under Designer
The step4-designer example renders a live FormViewer preview next to the Designer. Both widgets read from the same formSchema, so any
change you make in Designer is immediately reflected in the preview:
- Builder panel:
FormBuilderallows you to add, remove, and configure fields using the rsuite-based component set. - Preview panel: A separate
FormViewerinstance usesviewerViewandgetForm: this.loadCurrentFormto render the current schema with sample data. - Two-way feedback: Validation errors from the preview are collected into
previewErrorsand shown below the viewer, using the samecollectFormEngineErrorshelper as in the viewer-only example.
This layout makes it easy to iterate on form structure in Designer while continuously checking how the runtime form behaves for end users.
Summary
In this guide, you've learned how to integrate FormEngine with Angular applications:
- FormEngine setup: Install FormEngine packages and configure the Angular-React bridge using
@bubblydoo/angular-react - Reactive forms integration: Use
FormViewerwith Angular reactive forms, synchronizing data through thesyncFormDatacallback - Template-driven forms: Integrate FormEngine with Angular template-driven forms using the same viewer configuration
- Form definition: Create forms using JSON schemas with custom validators and styling
- Designer integration: Use
FormBuilderto visually create and edit forms with live preview - Real-time preview: Display a live
FormViewerpreview alongside the Designer for instant feedback
Key takeaways
- FormEngine works seamlessly with both Angular reactive and template-driven forms
- The
@bubblydoo/angular-reactlibrary provides a clean bridge between Angular templates and React components - Form definitions are portable JSON structures that can be created visually or programmatically
- Live preview capabilities enable rapid iteration during form design
Next steps
- Explore the FormEngine Core documentation for detailed API reference
- Check out the Validation guide for advanced validation techniques
- Review the Component library for available form components
- Visit the GitHub repository for more examples and source code