Actions
Overview
Actions are reusable, asynchronous JavaScript functions that enable you to handle events and interact with your form in a flexible and efficient way. There are three types of actions:
-
Common: These are pre-defined actions that provide a convenient way to perform common tasks with a form, such as:
- validate: Validates the form.
- clear: Clears the form fields.
- reset: Sets the value of form fields to their default value.
-
Code: These actions allow you to write custom JavaScript code directly in the designer's code editor.
-
Custom: These are custom actions that can be passed as properties to the FormBuilder or FormViewer component.
Events
Two events are described for each component connected to Form Builder: onDidMount, onWillUnmount. These events are triggered when a
component is mounted and unmounted, as for a typical React component. If you want to use other component events, you must
use event to define the component property you need. Example:
export const myButton = define(MyButton, 'MyButton')
    .name('MyButton')
    .props({
        children: string.required.named('Content').hinted('Caption').default('My Button'),
        danger: boolean.hinted('Set the danger status of button'),
        disabled: boolean.hinted('Disabled state of button'),
        onClick: event
    })
In the above code, the onClick property is defined as event. After connecting the component to the designer, you will see the onClick
event in the list of available component events and will be able to bind an action to this event.
Working with actions
Description
Actions work asynchronously, which means that they are executed in a sequential, step-by-step manner. This approach allows for efficient processing of multiple actions, ensuring that your form remains responsive and interactive. Here's how actions work:
- When an event is triggered, the assigned actions are executed one by one, in the order they were defined.
- Each action is executed independently, allowing the next action to start only when the previous one has completed.
- If an action encounters an error and returns a failure, the entire sequence of actions will be terminated, and no further actions will be executed.
The asynchronous approach ensures improved performance, flexibility to define complex workflows, and simplified error handling. To illustrate this concept, let's consider an example:
Suppose you have a form that inquires users to enter their data and click Save. The Save button incorporates two onClick actions:
- First for validating the results
- Second for showing the validation results
Therefore, in case the first validation action fails due to invalid data, the entire sequence will be terminated, and the following action will not be executed. For more details, follow the example below that illustrates how to define this sequence and such actions.
Example
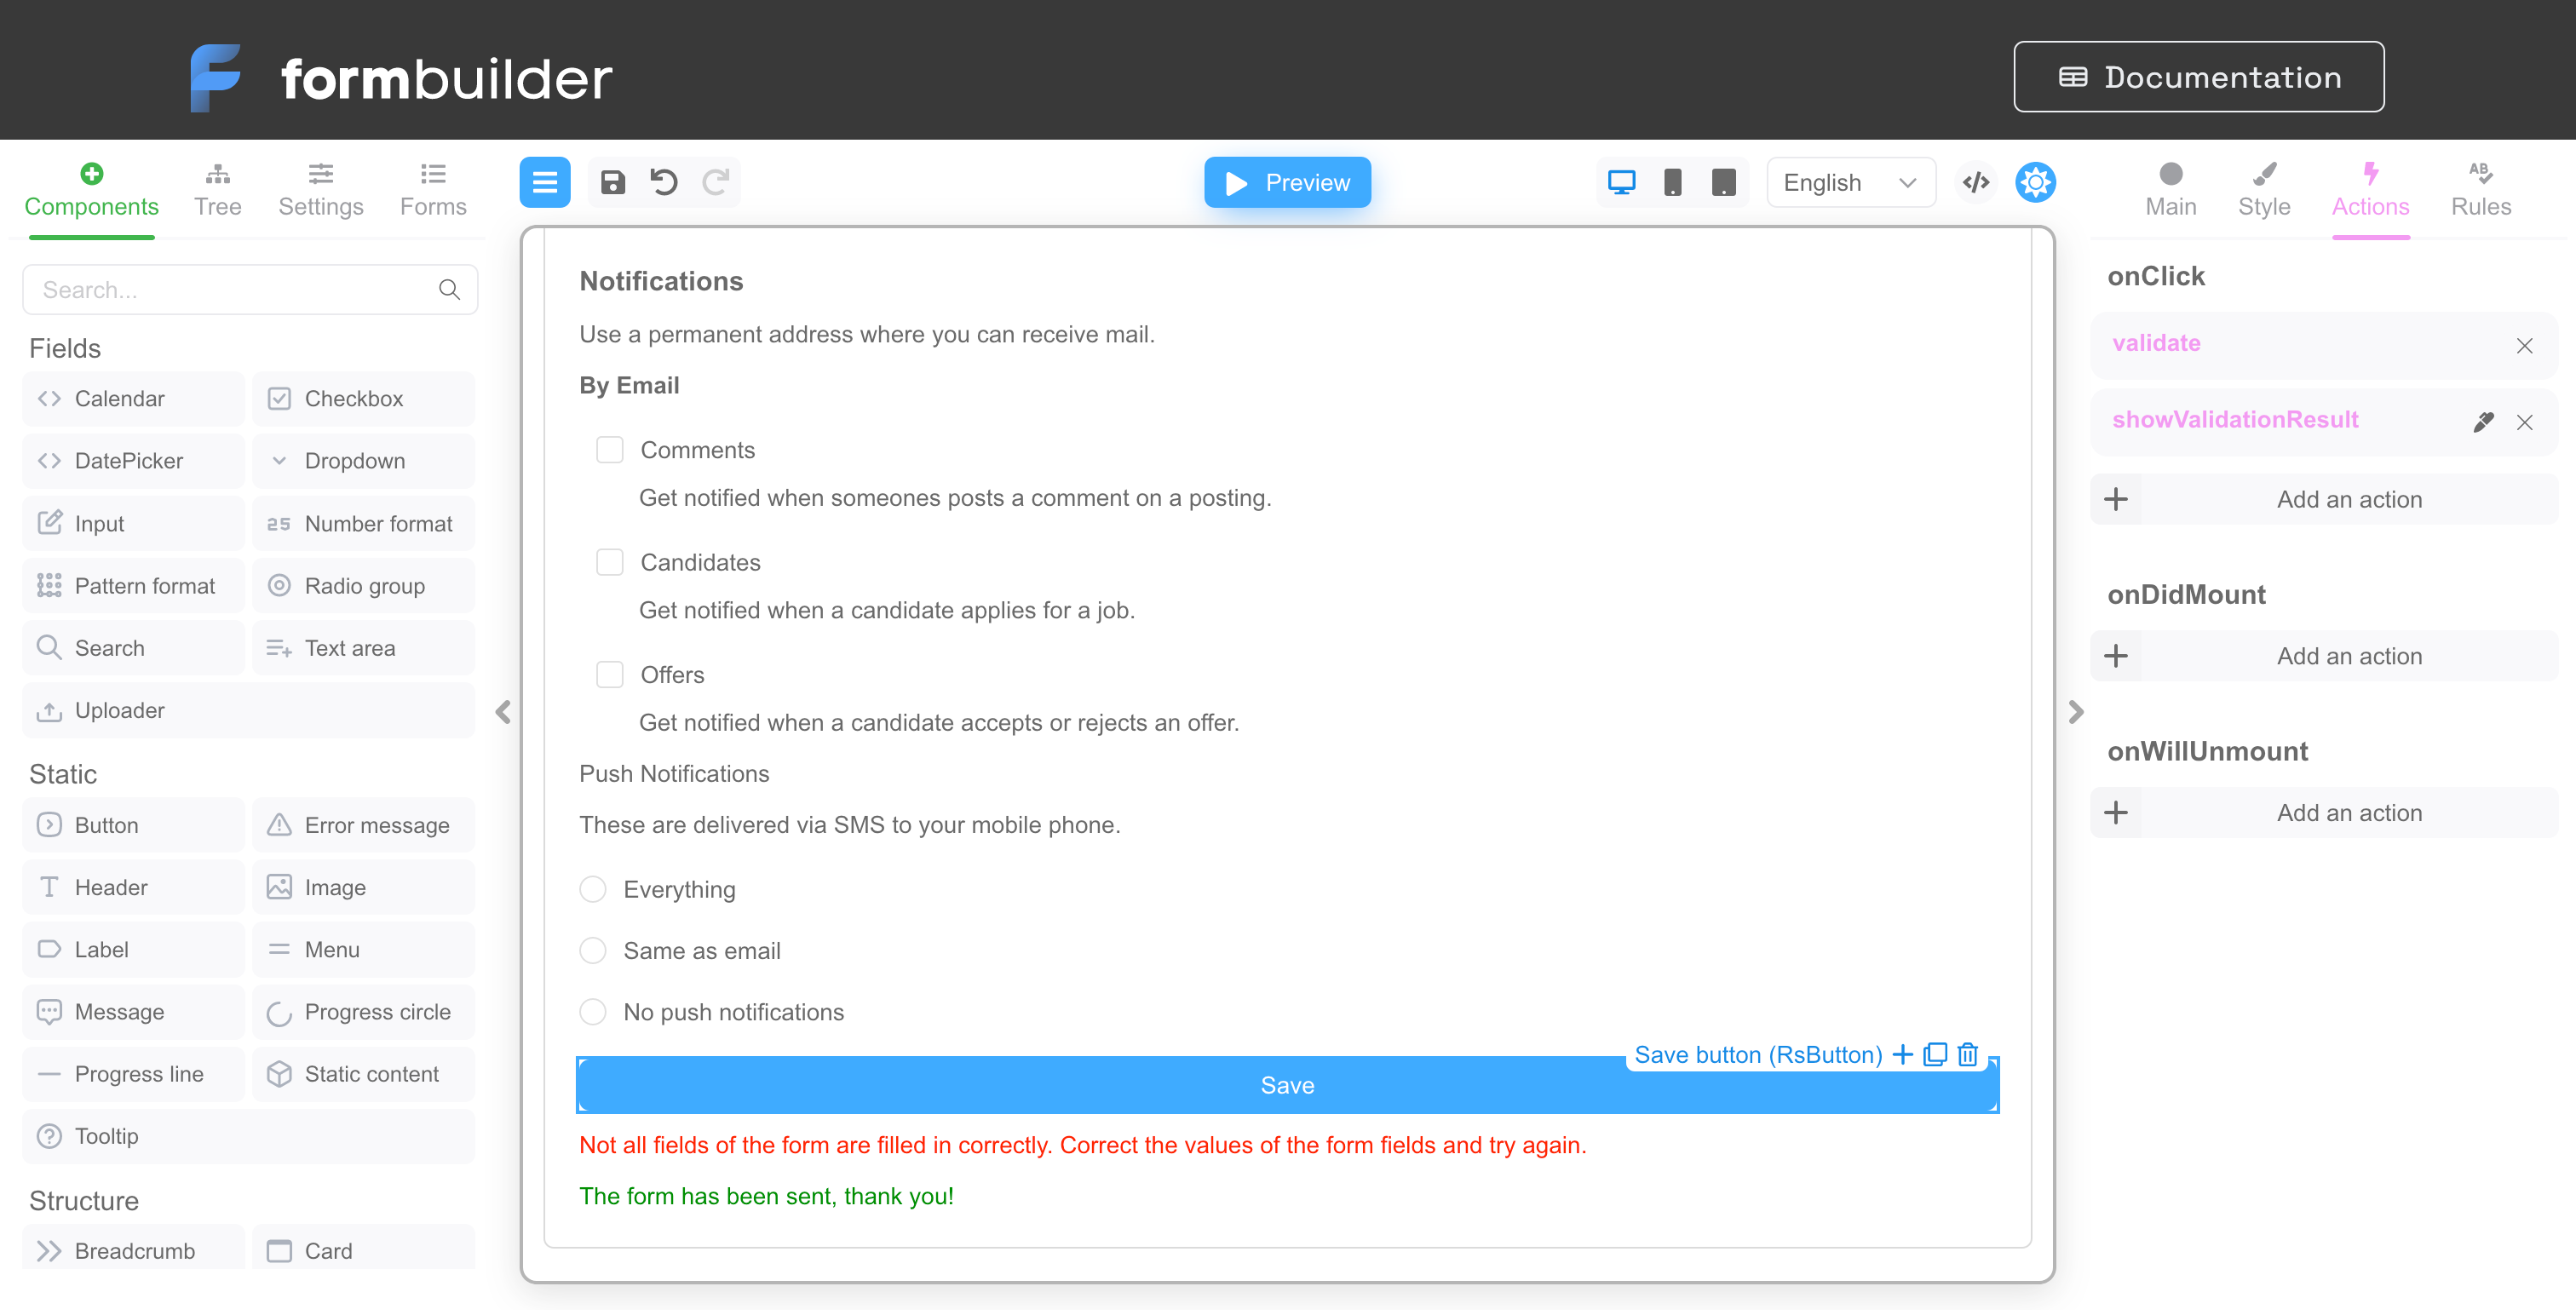
Let's open our demo and select the Save button in the designer, as shown in the screenshot below. In the right panel, select the "Actions" tab.

There are two handlers attached to the onClick event: validate and showValidationResult. The showValidationResult action is editable
because it is a "Code" action. The actions are executed sequentially, one after the other. You can change the order in which the actions are
called by simply dragging and dropping their names in the list. And of course you can add and remove actions.
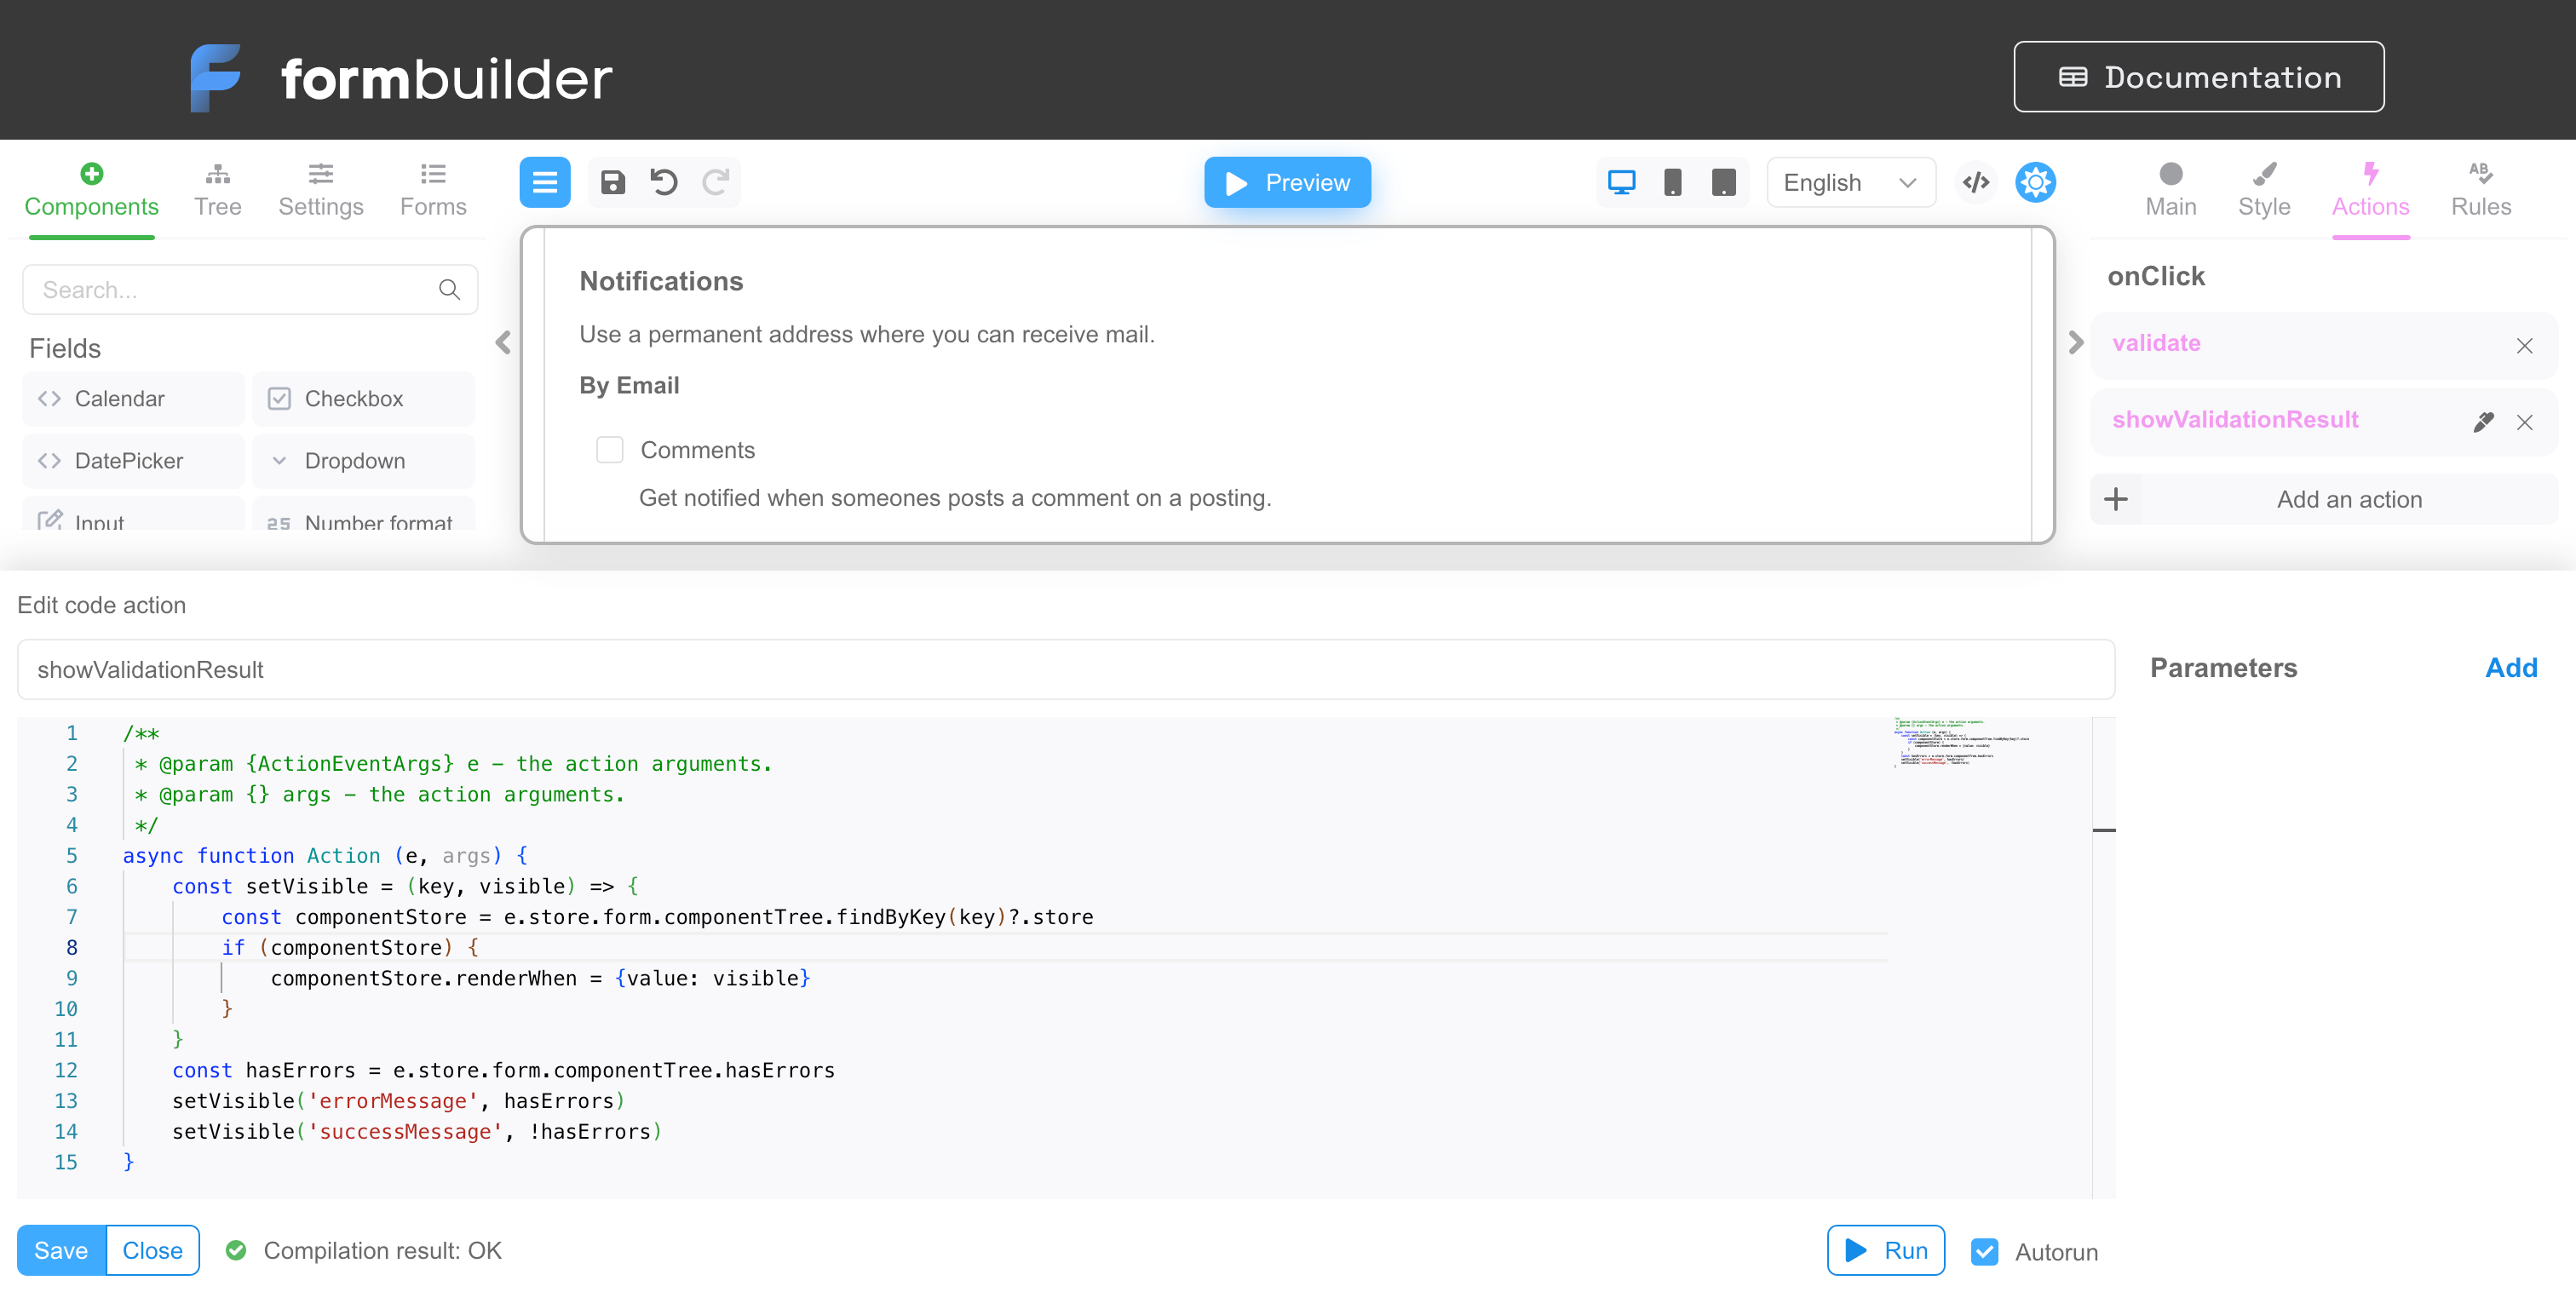
Click on the pen icon next to showValidationResult to open the action code editor. You should see similar to the screenshot below:

As you can see, an action is simply an asynchronous JavaScript function. The mandatory parameter is the action name and handler code. In the right part you can specify the action parameters. If the action has parameters, you can pass the values of the arguments to the parameters in the binding of the action to the event.
Let's take a closer look at the action code.
/**
 * @param {ActionEventArgs} e - the action arguments.
 * @param {} args - the action parameters arguments.
 */
async function Action (e, args) {
    const setVisible = (key, visible) => {
        const componentStore = e.store.form.componentTree.findByKey(key)?.store
        if (componentStore) {
            componentStore.renderWhen = {value: visible}
        }
    }
    const hasErrors = e.store.form.componentTree.hasErrors
    setVisible('errorMessage', hasErrors)
    setVisible('successMessage', !hasErrors)
}
There are two parameters in this function:
- e is an object of type ActionEventArgs.
- args - this object will store values of arguments of action parameters.
Line 6 contains the setVisible function, which is responsible for hiding or displaying the component on the form using the renderWhen
property. The hasErrors variable gets the value true if the form contains validation errors (line 12). Lines 13 and 14 show/hide
components with key field "errorMessage" and "successMessage". That is, in fact, this function just shows the component displaying the
error or the component displaying the success of validation of the whole form.
Custom actions
Custom actions can be passed through the actions parameter. The passed custom actions will be available in the selection in the form designer. You can find an example this page.
<FormBuilder
  actions={{
    logEventArgs: e => console.log(e),
    assertArgs: ActionDefinition.functionalAction((e, args) => {
      console.log(e, args)
    }, {
      p1: 'string',
      p2: 'boolean',
      p3: 'number',
      p4: 'function'
    })
  }}
/>
In the simplest case, a custom function is just an arrow function like logEventArgs from the example above. If you need a function with
parameters, use the ActionDefinition.functionalAction
function to define the action, as in the case of assertArgs.
Common actions
Common actions, also known as common functions, are reusable functions that can be used across multiple forms to perform specific tasks. These functions enable the reuse of various events on form inputs, making it easier to manage and maintain complex form logic. These common functions can be used via both FormBuilder and FormViewer.
Common functions are defined via the actions parameter. The following provides an example that showcases how to define a new common function for FormBuilder via this property:
<FormBuilder
view={builderView}
getForm={getFormFn}
formName={formName}
initialData={({})}
formStorage={formStorage}
localize={localizeFn}
onFormDataChange={({data, errors}) => {
console.log('onFormDataChange', {data, errors})
}}
viewerRef={setRef}
validators={customValidators}
actions={{
weatherRequest: ActionDefinition.functionalAction(async (e, args) => {
let latitude = Number(e.data.latitude)
if (Number.isNaN(latitude)) latitude = 40.416763
let longitude = Number(e.data.longitude)
if (Number.isNaN(longitude)) longitude = -3.703999
try {
const request = await fetch(`https://api.open-meteo.com/v1/forecast?latitude=${latitude}&longitude=${longitude}¤t_weather=true&ourly=temperature_2m,elativehumidity_2m,windspeed_10m`, {signal: AbortSignal.timeout(10000)})
const value = await request.json()
e.setUserDefinedProps({children: `Current weather is ${value.current_weather.temperature} °C`})
} catch (error) {
e.setUserDefinedProps({children: `Current weather is not available`})
}
})
}}
/>
This example function is called weatherRequest and it is implemented via the Open Meteo API. As the name implies, this function is used to
check the weather and display the results within forms. This function requires to specify coordinates. In case the weather data is available
for specified coordinates the function returns the temperature in Celsius.
The code snippet below showcases how to define a form that works with this function:
{
  "version": "1",
  "form": {
    "key": "Screen",
    "type": "Screen",
    "props": {},
    "children": [
      {
        "key": "rsContainer1",
        "type": "RsContainer",
        "props": {},
        "css": {
          "any": {
            "object": {
              "flexDirection": "row"
            }
          }
        },
        "children": [
          {
            "key": "latitude",
            "type": "RsInput",
            "props": {
              "label": {
                "value": "Latitude"
              },
              "placeholder": {
                "value": "Enter latitude, for example 40.416763"
              }
            }
          },
          {
            "key": "longitude",
            "type": "RsInput",
            "props": {
              "placeholder": {
                "value": "Enter longitude, for example -3.703999"
              },
              "label": {
                "value": "Longitude"
              }
            }
          }
        ]
      },
      {
        "key": "rsButton1",
        "type": "RsButton",
        "props": {
          "active": {
            "value": false
          },
          "appearance": {
            "value": "primary"
          },
          "color": {
            "value": "blue"
          },
          "children": {
            "value": "Check weather"
          }
        },
        "events": {
          "onClick": [
            {
              "name": "weatherRequest",
              "type": "custom"
            }
          ]
        }
      }
    ]
  },
  "localization": {},
  "languages": [
    {
      "code": "en",
      "dialect": "US",
      "name": "English",
      "description": "American English",
      "bidi": "ltr"
    }
  ],
  "defaultLanguage": "en-US"
}
The following snippet showcases how to implement the weatherRequest function for FormViewer:
<FormViewer
actions={{
weatherRequest: ActionDefinition.functionalAction(async (e, args) => {
let latitude = Number(e.data.latitude)
if (Number.isNaN(latitude)) latitude = 40.416763
let longitude = Number(e.data.longitude)
if (Number.isNaN(longitude)) longitude = -3.703999
try {
const request = await fetch(`https://api.open-meteo.com/v1/forecast?latitude=${latitude}&longitude=${longitude}¤t_weather=true&ourly=temperature_2m,elativehumidity_2m,windspeed_10m`, {signal: AbortSignal.timeout(10000)})
const value = await request.json()
e.setUserDefinedProps({children: `Current weather is ${value.current_weather.temperature} °C`})
} catch (error) {
e.setUserDefinedProps({children: `Current weather is not available`})
}
})
}}
{...otherProps}
/>
Therefore, by adding the weatherRequest function to FormViewer or FormBuilder and using the provided example form, you can enter the
coordinates and display the temperature data. You will also be able to use this function as a common action within your other defined forms.